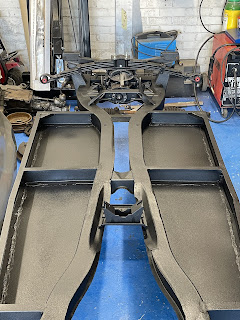
Welcome back along, not a massive leap in progress here I’m afraid but the final paint finish for the chassis and this means I can start to build it all up now and get it rolling…. Phew, it’s getting heavy!
Over the past few weeks the weather has definitely turned and the second weekend of the month saw the thermometer showing a giddy 18 degrees, so out came the chassis from the garage and a good clean down, degrease and etch prime ready for more texture top coat. I learnt my lesson last time and have put down poly sheet all over the floor to protect the slabs slightly as the fall out last time got a tad messy and sticky. But this time it’s just a dusting of etch primer so shouldn’t be too bad, but prevention is better than cure and it was much easier to tidy up this time around.
I started off by just scotch pad scuffing the chassis bare metal all over and a good degrease to remove anything that could potentially stop the primer from biting in to the metal and stopping the bond. I won’t be hitting with the black texture top coat until a week after to allow the primer to fully cure and less risk of any reaction.
The first coat of primer went on well and has covered nicely, fair to say it uniformed everything and makes it look much better. So after an hour or so to tac off I flipped the chassis over and hit the underside of the floor pan also.

Again it didn’t take me long to lash the underside with the primer also, and after another few hours I had got the chassis back in the garage waiting a week for the final finish. During this time I have also sealed all the panels with seam sealer.
The seam sealer does exactly what it says and will seal the panel join to protect it from corrosion and moisture. I have sealed all the internal and external seams along with the sills on either side. This “should” help reduce the risk of water ingress and corrosion setting in so it’s a preventative measure really, however it does neaten off all the seams and makes them look much better. The underside of the chassis now looks really good and the sealer between the chassis and floor pans just looks right as well as practical.

Next up is to get hitting it all with some topcoat. Same stuff as last time before I welded on the new floor pans and out riggers. It’s a 2k product called Gladiator bed liner (Raptor alternative) Its extremely hard wearing and gives the desired texture finish that I want. I deviate slightly from what everyone else does with this product and thinned it slightly to put a base coat down with a 1.7 gravity gun. Then after 20/30 minutes to tac a little I then hit it with the schutz gun to give the texture finish. I’m treating all the running gear to the same finish as the chassis, so when finished then the final product will hopefully look fairly uniform and consistent throughout. Once this was all done the chassis is ready to start taking some rebuilt running gear and a start on getting this project rolling.

I learnt my lesson off last time when I applied some paint and I have covered the floor with protective sheet, the fall out literally goes everywhere and is sticky as sh*t but all went well and the chassis was soon done. I erected my pop up gazebo again and used that to hang all the running gear components from with old rusty mig wire which allowed me to get a good coverage on all parts, and then it was just to leave it all to harden and cure…. Which didn’t take long with the weather being so good currently.
So fully painted chassis is back in the garage and is looking great, it will be a shame to cover it all up never to be seen again upon the rebuild. However the next update should be fairly soon as I had a delivery of nuts, bolts and bushes a few weeks back so I’m ready to start the next step straight away really.


